Tricks for repotting houseplants with confidence
- Choose the right soil for your houseplants.
- Optimize the pot size for healthy root growth.
- Know the signs your plant needs repotting.
- Master the intricacies of gentle root handling.
- Care for your plant post-repotting to ensure recovery.
Repotting houseplants can seem daunting, but with the right techniques and a little confidence, you can transition your plants comfortably into their new homes. Whether you're upgrading to a larger container or simply refreshing their soil, understanding the basics will help your plants thrive. Let’s explore the essential tips and tricks for successful repotting.
When to repot your houseplants
Recognizing the right time for repotting is crucial. Here are some common signs that your houseplant is ready for a new pot:
- Root growth is coming out of the drainage holes.
- The plant is top-heavy and unstable in its current pot.
- The soil dries out quickly after watering.
- It's been more than a year since the last repotting.
Choosing the right pot
Picking the right pot is key to ensuring your plant's success. A pot that's too small won't allow for healthy root growth, while one that's too large can lead to overwatering issues. Here are a few factors to consider:
| Pot Size | Recommended Use |
|---|---|
| 1-2 inches bigger than the current pot | Ideal for most houseplants when repotting. |
| 3-4 inches bigger | For plants that have significantly outgrown their pots. |
| Same size pot | For refreshing the soil without changing pot size. |
Essential materials for repotting
Having the right materials on hand will make the process much smoother. Here's a quick checklist:
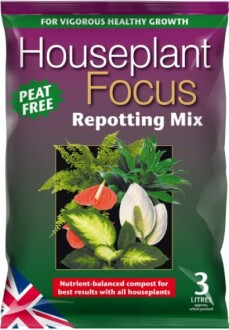
- Fresh potting soil (consider using Houseplant Focus Repotting Mix for optimal results).
- A new pot with drainage holes.
- Watering can or spray bottle.
- Gardening gloves.
- Scissors or pruning shears for trimming roots (if necessary).
Steps for successful repotting
Follow these steps to repot your houseplants effectively:
1. Prepare the new pot
Add a layer of fresh potting mix (about 1-2 inches) to the bottom of the new pot.
2. Remove the plant gently
Carefully remove the plant from its current pot by gently squeezing the sides of the pot and sliding it out. If it’s stuck, run a knife around the edges to loosen it.
3. Inspect the roots
Check for any dead or unhealthy roots. Trim them with scissors or pruning shears to prevent rot.
4. Place the plant in the new pot
Set the plant in the center of the new pot and fill around the sides with additional potting mix. Ensure the top of the root ball is level with the pot’s rim.
5. Water the plant
Water the plant lightly to help settle the soil. Be careful not to soak it!
Post-repotting care
After repotting, your plant may experience transplant shock. Follow these tips to help it get back on track:
- Place the plant in indirect sunlight for a few days.
- Be cautious with watering—allow the soil to dry out between waterings until the plant adjusts.
- Fertilize sparingly if needed, but opt for a gentle formula after two weeks post-repotting.
Conclusion
Repotting houseplants doesn’t have to be a stressful task. By paying attention to your plants' needs and following these guidelines, you can ensure they thrive in their new environment. Happy gardening!
Houseplant Focus Repotting Mix
This peat-free potting soil is ideal for nourishing and invigorating your indoor plants, ensuring their health and growth.
Learn MoreFurther reading
Expand your gardening knowledge with our resources:
